Approving Travel Requests & Expense Reports
Latest News
BUDGET APPROVERS: You have 10 days to approve. If you do not take action on something requiring your approval, the system will auto-approve it after 10 days. Then it will route to the next approver (the traveler's manager).
MANAGERS: You have 10 days to approve. If you do not take action on something requiring your approval, the system will automatically re-route it to YOUR manager after 10 days. If that approver does not take any action, the approval time expires and the traveler will need to recall and resubmit.
Reviewing & Approving
Reviewing & Approving a Travel Request
The approver will see requests awaiting approval under Authorization Requests on the Concur home page. Trip elements cannot be booked until approval occurs.
- Select the Request you wish to approve by clicking the Request Name.
- Review the Request Header and the Expense Summary.
- Review destination and see if banned state or alerts for high hazard destinations are noted.
- Take note of any personal days and consider that estimated costs are prorated accordingly (i.e. daily meal allowances, incidentals, etc.).
- Review attachments to obtain further information about purpose of trip.
- Review all expenses for reasonableness and completeness.
- There are three approval options:
- Approve – approve the Request.
- Approve & Forward – Approve and Forward the Request for additional approval. In the User-Added Approver box, type in the last name of the approver and select from the dropdown box. You can only select users who are already designated as approvers in the system.
- Send Back Request – Return the Request to the traveler. Use the Comment field in the Send Back Report window to explain the reason the report is being returned, then click OK.
Once Travel Requests have been acted on by the approver, notification regarding the status will be sent to the traveler (and delegate if opted into notifications) and the status will be noted on the traveler’s Manage Requests page.

Reviewing an Expense Report
- On the home page, in the Required Approvals section of My Tasks, click on Required Approvals title of the blue arrow to the right.
OR
On the home page, in the Quick Task Bar, click the Required Approvals tile.- The Reports Pending your Approval page lists the awaiting reports. Select the report you want to open.
- Review the report. Things to consider:

- Review dates and locations of expenses compared to the original request.
- Take note of any personal days on the request and whether expenses were claimed on those dates.
- Compare the total amount being claimed for reimbursement with what was requested.

- Is there an alert/warning about attaching an agenda? This warning will not disappear after the agenda is attached.
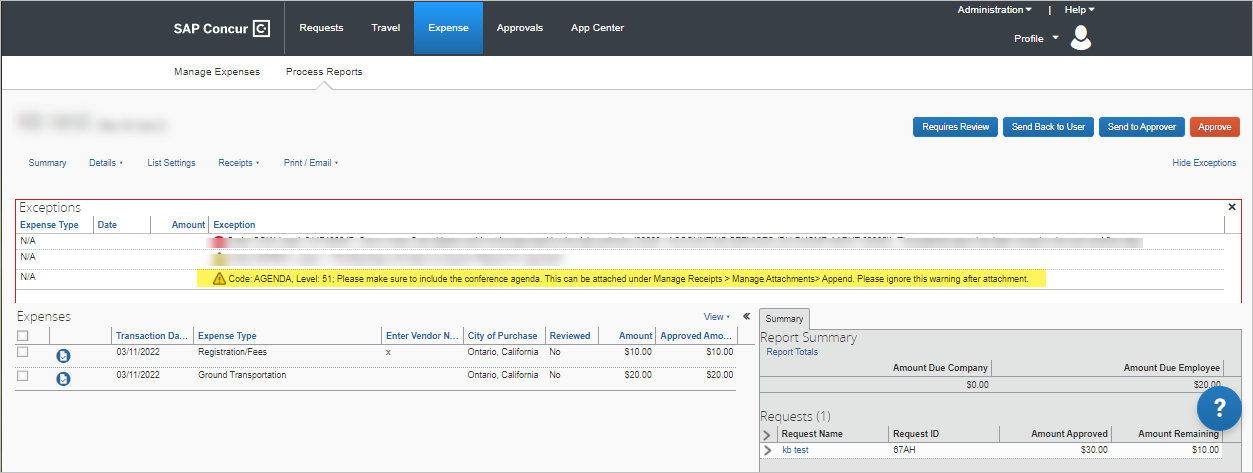
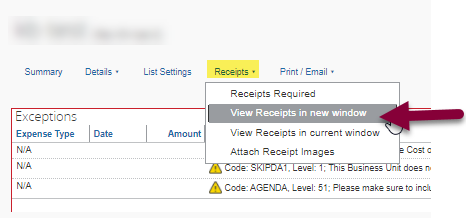
To verify it is attached, click Receipts, then View Receipts in new window. This will combine ALL attachments (agenda, receipts, etc.) into one file for your review.
- Review all expenses for reasonableness and completeness.
Approving an Expense Report
If you are satisfied with the Expense Report, click Approve in the top right corner of the screen.
Sending Back an Expense Report
During your review, you may choose to return the entire expense report to the employee for correction.
To return a report:
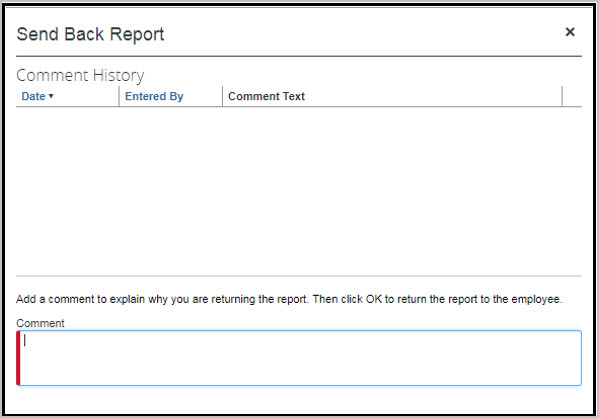
- Click Send Back to User. The Send Back Report window appears.
- Enter a Comment for the employee explaining why you are returning the report.
- Click OK.

Adding an Additional Reviewer/Approver Step
You will have the ability to send the report to another approver. To approve and forward a report:
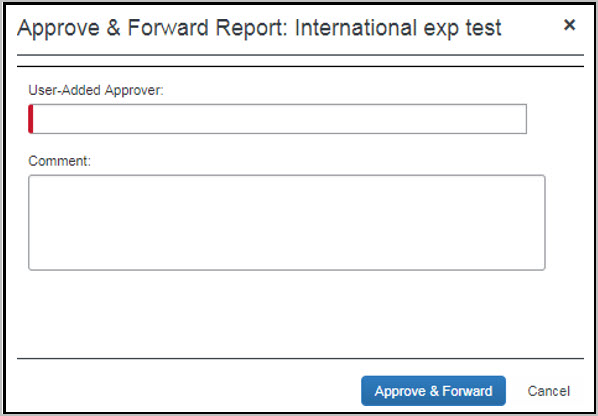
- Click the Approve & Forward button in the top right of the screen.
- Enter the User-Added Approver, and add a comment, as needed.
- Click Approve & Forward to approve the Expense Report and send to the next approver.
Delegating
- You will receive an email from Concur when there is something pending your approval as a temporary delegate. It will look like this and will say "There is a request pending approval by [name of person who temporarily delegated you]. You are receiving this email because that approver designated you as a delegate."

- Once logged into Concur, click on the person icon at the top right, click Act as Another User, select A Delegate for another user who has granted you this permission, then search the name of the person who has temporarily delegated you and click Switch.

- At the top left, expand the Home menu and click Approvals.

- Anything pending approval will appear here.

- To switch back to your own Concur account, click the person icon again, select Myself, click Switch.
Delegating Approver Duties
In the case of an absence an approver can delegate the approval step to another person for a temporary window of time.
To add a delegate:
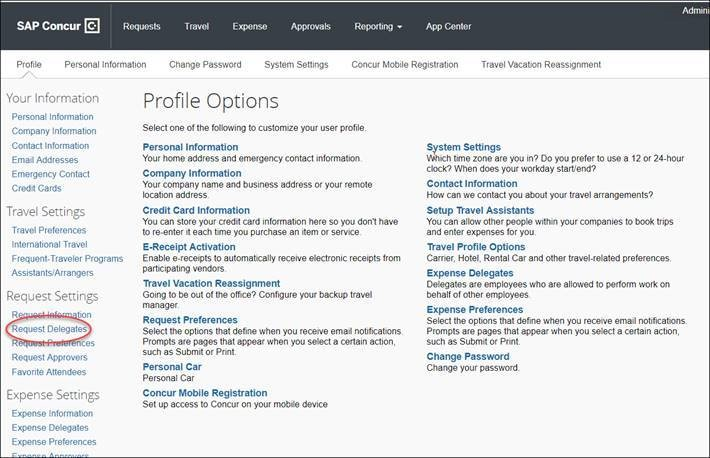
- Click Profile > Profile Settings, on the left hand side of the page under the Request Settings header click Request Delegates.
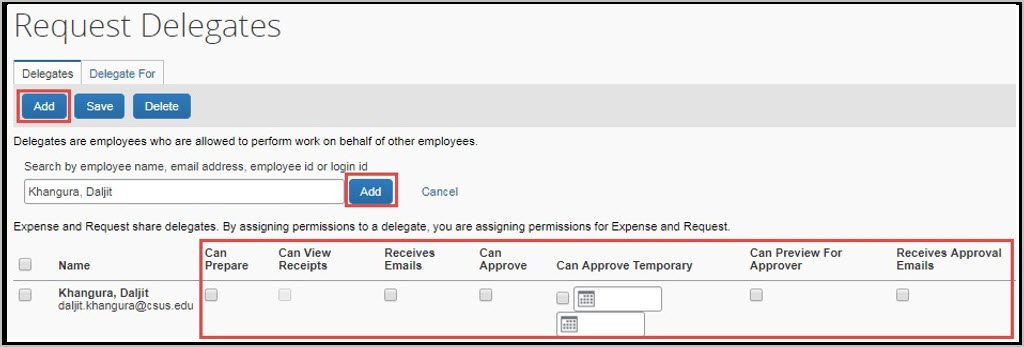
- On the Request Delegates page, click Add. The search area appears.
- Type at least the first three letters of the employee's last name to search for the person you wish to add as a Delegate, and click Add.
- Check the boxes that correspond with the permissions you are granting to the delegate. In the example below, if you wanted to delegate the approval function only you would check “can approve temporary” add the dates of temporary approval authority and check the “receives approval emails” so that they are also notified as submissions occur.
Option | Description |
*Can Prepare | If selected, the delegate can create expense reports and requests on your behalf. |
*Can View Receipts | If selected, the delegate can view receipt images from your Receipt Library. They will need this in order to prepare Expense Reports on your behalf. |
*Receives Emails | If selected, the delegate receives a copy of each Expense related email that you receive, except for approval emails. This is important so they can make any corrections on your behalf. |
Can Preview for Approver | If selected, the delegate can preview requests and expense reports on behalf of an approver. This delegate cannot approve the request/expense report, but after they review they click "reviewed" and it goes to the approver for approval. |
Receives Approval Emails | If selected, the delegate receives a copy of each Expense approval-related email that you receive as an approver. |
(*) Can Approve | DO NOT USE, our approval flow is defined by other systems behind the scenes. |
(*) Can Approve Temporary | If selected, the delegate can approve expense reports and requests on your behalf but only for the specified period. If you select this option, you must also select beginning and ending date. Use this when you take time off or are out for an extended time. |
(*) The option to delegate approver rights will only be available for Approvers in the system. The approver’s rights can also only be delegated to another user who also has approval rights in the system. This function can be used for times when an approver is unavailable and approval tasks will be covered by another person in their absence (i.e. Dean unavailable and approvals would be routed to Provost).
- Click Save.
- To delete a delegate click the checkbox to select the person, click Delete, and confirm deletion.
- Once logged into Concur, go to your Profile Settings.
- Click Expense Delegates.

- Click Delegate For to see who has named you a delegate, as well as the details.
