Expense Report
Latest News
Create an Expense Report


Before Submission
There are various ways to add expenses and compile a complete expense report. Overall, the goal is to reflect all costs associated with a trip, regardless of payment method.
Travel Credit Card/Ghost Card Charges
You can add Concur Travel card transactions to an expense report in these ways:
- From the open expense report (Add Available Expenses)
- From the Available Expenses section (Expense > Manage Expenses)
- From the open expense report, click Add Expense. Select related expenses and then Add to Report button.
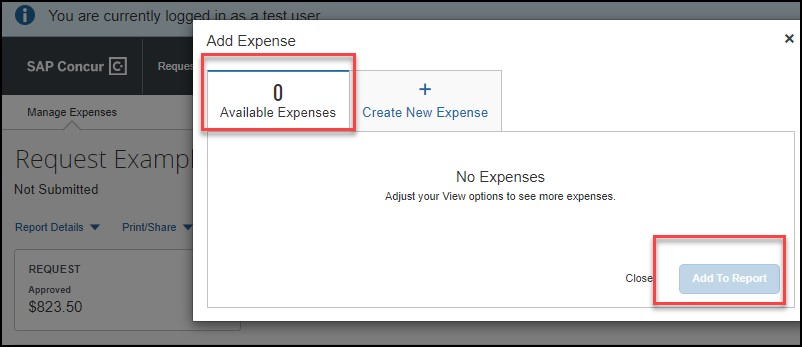
- Verify or update the Expense Type classification of the imported credit card transactions or any other required fields that need to be populated.
- From the Available Expenses section, select each transaction that you want to assign to the current expense report.
- Click Move and select the related expense report.

- b. Verify or update the Expense Type classification of the imported credit card transaction.
- Click Move and select the related expense report.
Out-of-Pocket Expense
To add an out-of-pocket expense to an Expense Report:
- From the open report, click Add Expense.
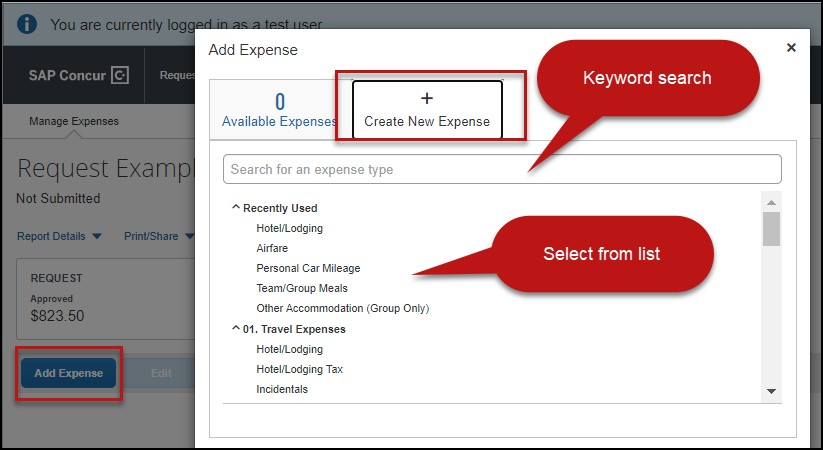
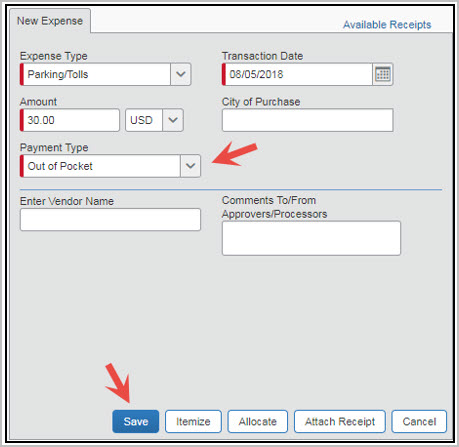
- On the New Expense tab, click the appropriate expense. Each expense type will have its own set of required fields and configuration.
- The page refreshes, displaying the required and optional fields for the selected expense type.
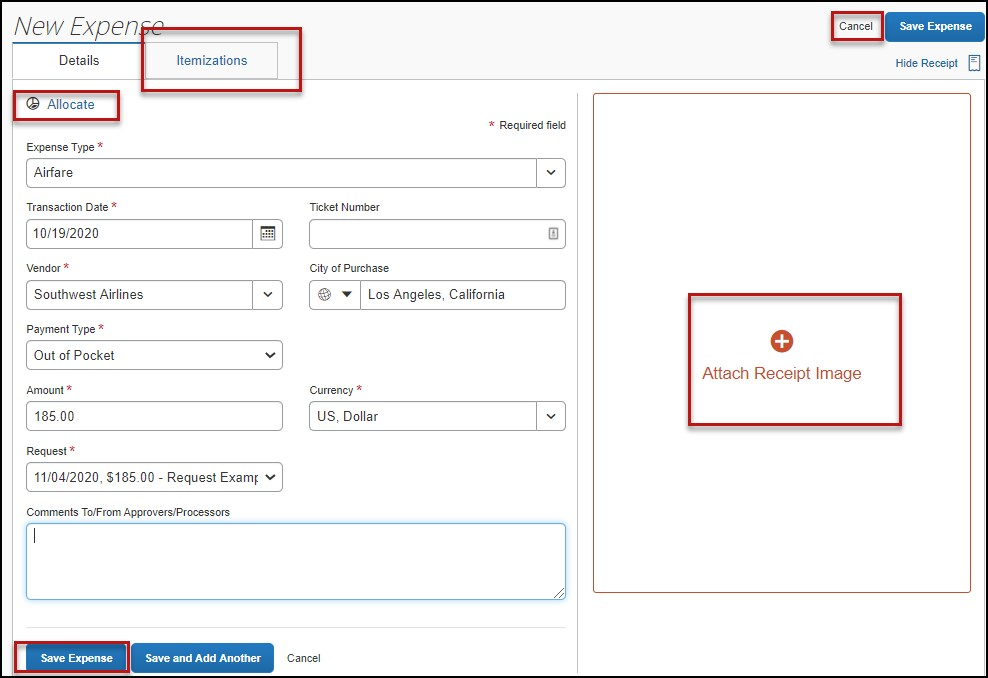
- Complete the required and optional fields. Click one of the following:
- Save
- Itemizations - to itemize the expense and classify as two different expense types (i.e. dinner and parking). NOTE: Hotel expenses require itemization to break down nightly rates, taxes, etc.
- Allocate - to allocate the expense between various chartfields as applicable
- Attach Receipts - to upload and attach receipt images
- Cancel - to exit without saving this expense
- CSU and campus specific audit rules are integrated into the system. When adding an expense that requires a certain action an alert message will appear:

Meals
These instructions are for individual travel. Please contact the Travel Desk for instructions for Group Travel meals.
- Travel Allowance > Manage Travel Allowance

- Create New Itinerary

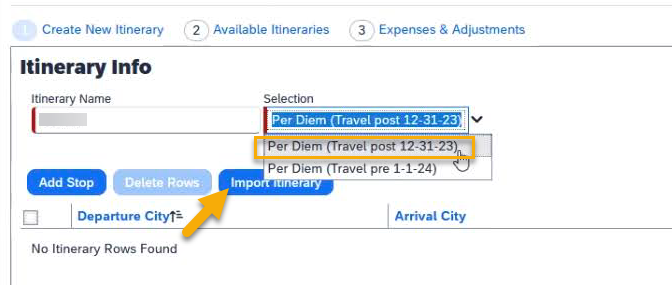
- If you booked IN CONCUR, you can import your itinerary (if you booked outside of Concur, skip to Step 5 to manually create an itinerary). First select Per Diem (Travel post 12-31-23), then click Import Itinerary:
- You may now skip ahead to Step 8.
- If you booked outside of Concur, you must manually create an Itinerary. Add and save each leg of the trip:

- All legs of the trip should now be listed:

- After clicking Next, your “Available Itineraries” will be listed along with the rate location being used by each. This is automatically determined by the system. Click Next.

- The “Expenses & Adjustments” screen is used to exclude allowance for meals provided and personal travel days:

- A summary of your meal & incidentals:

- If you purchased all meals using cash or personal cards, you are finished.
- If you purchased any meals using the Travel Card, please proceed to Step 12.
- Click Add Expense.

- Select the appropriate Travel Card expense(s) from the Available Expenses:

- In the next screen, click on the added expense.

- Change the Expense Type to “Meals Charged on Campus Issued Card.”

- Continue to do this for each Travel Card meal expense for the trip.
Personal Car Mileage
You must register a car for the applicable mileage type in order to be reimbursed for mileage. See Personal Car section for instructions on setting up your vehicles.
To Create a Car Mileage Expense
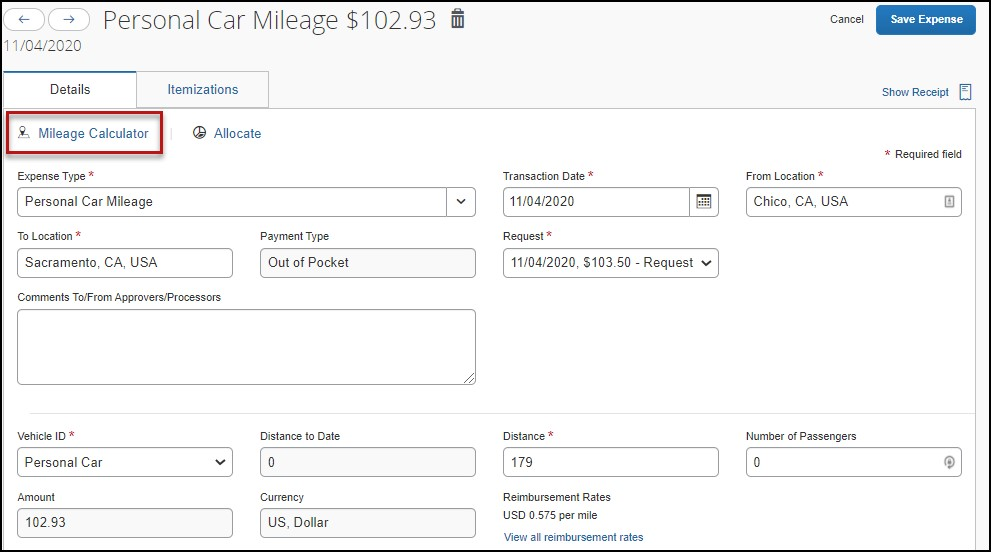
- With the Expense Report open, on the New Expense tab, select the Personal Car Mileage Expense Type. The mileage form will open with the required and optional fields displayed including the Mileage Calculator link.
- Complete all required and optional fields as appropriate.
- Click the Mileage Calculator link and review and update the route as appropriate. If round trip mileage should be calculated, click Make Round Trip.
- Click Add Mileage to Expense.
- Click Save.

Use the Itemize feature to account for transactions that should be charged to multiple expense types (accounts codes). Itemization should be completed prior to Allocation (charging to multiple chartfields).
To Itemize a General Expense
- Add the expense as usual and then click Itemizations tab. The itemized amount must match the total expense.
- Select Create Itemization button, select the expense type that applies to the first itemization. The page refreshes, displaying the required and optional fields for the selected expense type.
- Complete the fields as required.
- Click Save.
- The expense will now reference an “itemized” note under the amount.

- The expense will now reference an “itemized” note under the amount.
- Repeat for each additional itemization, on the Itemization tab, select the appropriate expense type and complete the appropriate fields.
To Itemize a Hotel Expense
A hotel bill typically contains a variety of expenses including room fees, taxes, parking, meals, telephone charges, and maybe personal items. You must itemize these expenses so that they can be reimbursed correctly.
To Create a Lodging Expense
- With the Expense Report open, on the Create New Expense tab, select the Hotel/Lodging expense Type. The lodging form will open with the required and optional fields displayed.
- Complete all required and optional fields as appropriate.
- Click Itemizations tab then Create Itemization button. Search/select the Hotel/Lodging expense type.
- The number of nights and dates involved appear automatically.
- Select The Same Every Night or Not the Same depending on the respective hotel details. If not the same each night (i.e. increase for weekends, etc.) this option will let you note the differences from day to day, otherwise select same every night to itemize full cost of stay by respective classification.
- Enter the Room Rate, Room Tax, and Additional Charges.
- Click Save Itemization
If there is a remaining amount to be itemized (other charges, for example, for parking or meals), the remaining amount is displayed in the Remaining field. Continue to itemize the amounts until the balance is $0.00.

The Allocations feature allows you to allocate selected expenses to multiple chartfields. This should be performed after the Itemization if allocating to multiple expense types.
To Allocate
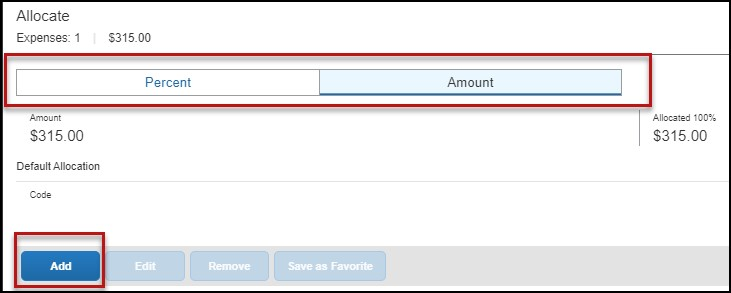
- Allocate single expense - With the report open, select a single expense and click Select Percent or Amount, then Add and enter the new chartfield designation.
- To allocate multiple expenses (or the entire report), select the expenses and then select the Allocate button.
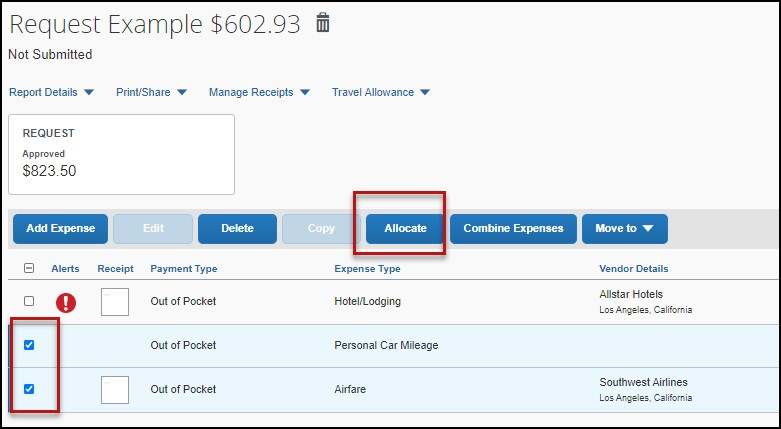
Select Percent or Amount, then Add and enter the new chartfield designation.
- Click Save.
There are several ways to attach receipts to an Expense Report.
Uploading Scanned Documents
Files scanned and saved to a folder on your computer may be uploaded directly into an Expense Report using the following steps:
Scan the documentation into a .png, .jpg., .jpeg, .pdf, .html, .tif or .tiff file; 5 MB limit per file.
- With your transaction open, select Attach Receipt.
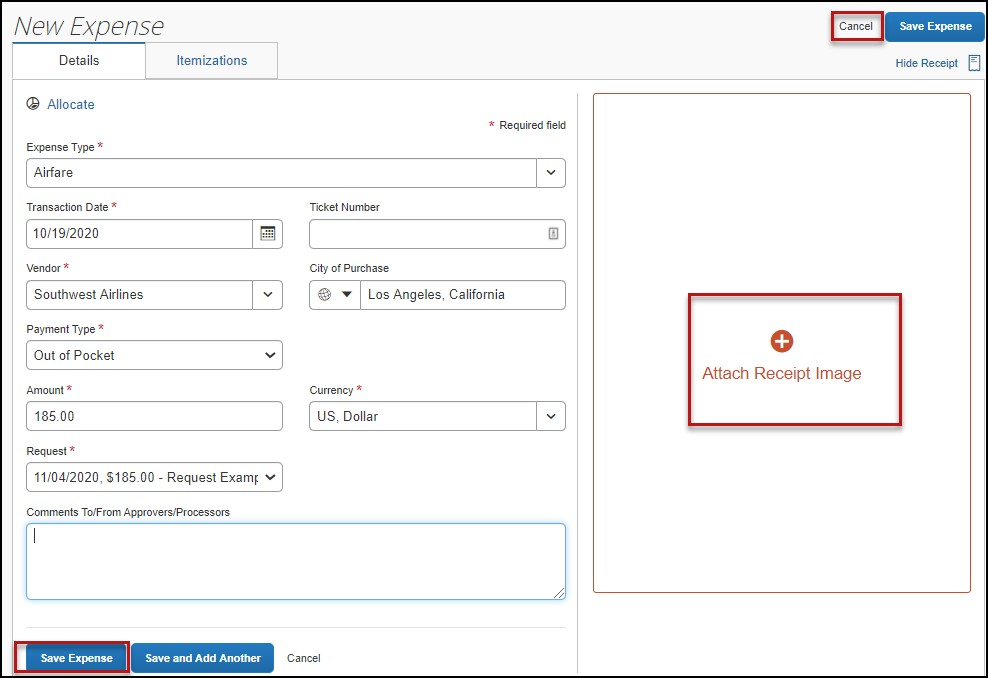
- Browse your computer to find the scanned document.
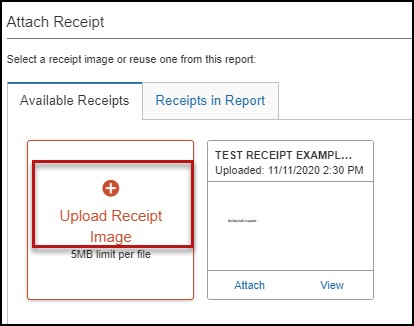
- Click Attach.
Using Available Receipts Library
Users can upload images to the Available Receipts library which stores the receipt until the user is ready to attach it to an Expense Report. Receipts can be uploaded to Available Receipts using various methods.
Email Receipts to your Concur Profile
- Before emailing receipts to the Available Receipts library, you must verify your email address for verification in the Personal Information section of your Profile.
- Click Profile > Profile Settings. The Profile Options page appears.
- On the left-hand side of the screen, click Personal Information.
- On the Personal Information screen, scroll down to the Email Addresses section.
- Follow the below steps to verify your email address:
- Once you have saved an email address, click Verify.
- Check your email for a verification message from Concur.
- Copy the code from the email message into the Enter Code box next to the email address.
- Click OK to submit the code and complete
- Prepare an email to receipts@concur.com, attach the images, and send the email. The available file formats are: PNG, JPG, JPEG, PDF, HTML, TIF, or TIFF.
Receipts Captured with Concur App
Any receipts captured using the Concur app will automatically place the images in your Available Receipts library and can be attached as described below.
To Attach a Receipt Image to An Expense Entry Using Available Receipts
- In the Expense Report, select an expense entry to open it in Detail view.
- Click Attach Receipt Image > View Available Receipts.
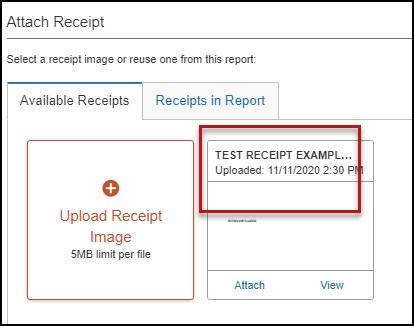
- Select the appropriate image and choose attach. Click Save. The receipt column will be populated and you can hover over or click the receipt box to view the receipt attached.

You may receive an alert/warning that you need to attach an agenda.
This warning will not disappear after you have attached an agenda. Please ignore if you have already attached it.
To attach it or to verify you have already attached it, follow these steps.
- Click Manage Receipts, then Manage Attachments

- Click the box to select the file for upload

- After selecting file, click X at far top right corner or simply click off of the attachment box

- To upload more attachments (amend), view existing attachments, or delete attachments, click Manage Receipts, then Manage Attachments

International, Alaska & Hawaii trips will require Travel Allowance itineraries to be created to utilize GSA per diem amounts, which are used as ceiling amounts for related expenses.
- Create or open your related expense report and select Travel Allowance hyperlink then Manage Travel Allowance to build your trip itinerary.
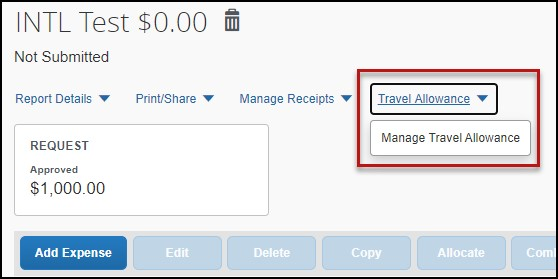
- The Travel Allowances window will appear allowing you to build your trip. Select Create New Itinerary and enter the first leg of your trip and click Save.

- Continue entering all legs of the trip by selecting the Add Stop. An itinerary must consist of at least 2 legs; one leg for departure details and a second leg for your return details.
- When all portions of the trip are entered, click Next.
- On the Available Itineraries tab, you can view the itinerary that you have assigned to this trip.

- Click the Expense & Adjustments tab to mark any meals which were provided during your trip, and then click Create Expenses to return to the expense report and add trip costs.

- You can begin adding either out-of-pocket expenses and/or Travel Card transactions to your Expense Report.
Converting Foreign Currency Transactions
- With the Expense Report open, click Add Expense, and then enter the appropriate information in the required and optional fields (required fields are indicated with a red asterisk).
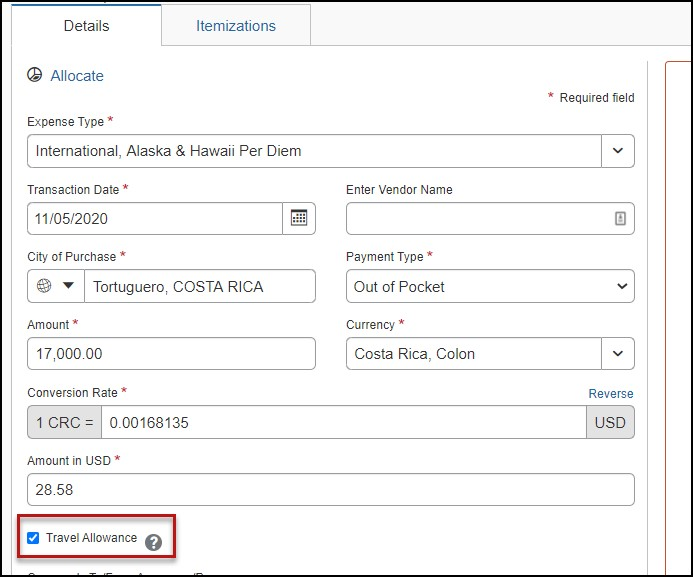
- For the Amount field enter the amount spent in foreign currency. The correct currency should populate based on the City of Purchase information you entered. If needed, you can change the currency from the list to the right of the Amount field.
- Expense calculates the amount in USD.
- If expense amount is already in USD, enter amount in Amount in USD field and it will calculate the foreign amount for you.
- Complete the remaining fields as appropriate and make sure the Travel Allowance box is checked before saving the expense. This is what will be used to check the amount against the GSA travel allowance rates for that specific destination. If this box is not checked the report will not be able to be submitted until that occurs.
- Review summary of actual costs in relation to allowance ceiling. Select Travel Allowance hyperlink, Manage Travel Allowance, and then select the Reimbursable Allowances Summary to see the breakdown. The example below intentionally shows an expense in excess of the allowance ceiling to demonstrate the adjustment that will be made to the reimbursable amount or the traveler. Actual expenses, up to the allowance ceiling are reimbursable.

If you had a cash advance issued, you will need to expense the cash advance with your expense report for the associated trip the advance was used for. Cash advances are reserved for group travel.
To Expense a Cash Advance (Fully utilized)
- Click on Requests, Active Requests, find the request you are ready to expense and click on Expense located under Action.

- Finish completing the Report Header and click Next.
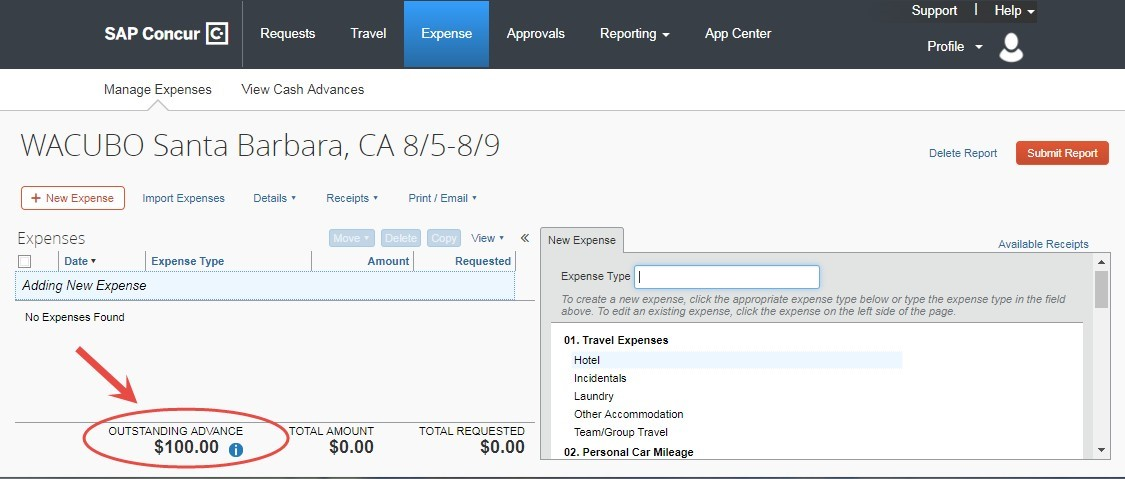
- At the bottom of the report you will see Outstanding Advance. This should be the amount you received for the cash advance.
- Continue to enter your expenses as normal. When you enter an out of pocket expense, the outstanding cash advance balance will reduce.
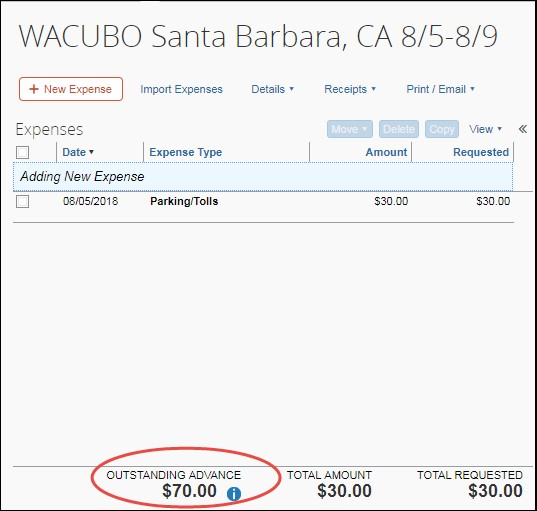
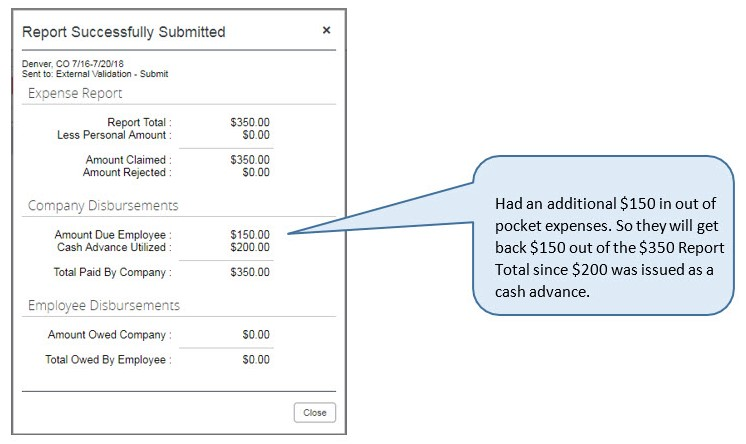
If the Outstanding Advance balance is zero, then the cash advance has been fully utilized. If you have additional out of pocket expenses, you will receive the balance you paid out of pocket minus the cash advance amount. - Make sure all expense have been entered, and receipts have been attached. Click Submit.
- A pop up window will appear and state Report Successfully Submitted with a summary of the expense totals and disbursements.
- A pop up window will appear and state Report Successfully Submitted with a summary of the expense totals and disbursements.
To Expense a Cash Advance (Excess Funds to be returned to the University)
If there are funds still available from the advance after accounting for all expenses, you will see two messages.
- At the bottom of the screen:

- The following message will appear when you attempt to submit the expense report.

To Pay Back the Excess Funds and Enter Returned Cash Advance Amount
- Go to the Cashier’s office to return the excess funds. The amount will be shown under Outstanding Note, the AP team will be monitoring activity and reaching out to any individuals that need to repay the campus, with relevant instructions.
There are situations where a travel request may be submitted, for in-state travel with mileage and parking only, for an entire fiscal year. While the travel request covers the full fiscal year, an expense report needs to be submitted monthly, at the end of each calendar month. Only mileage and parking fees are permitted. If the trip includes any other expenses, a regular, non-blanket Travel Request needs to be submitted instead, and an Expense Report submitting against that unique Travel Request.
Submit an Expense Report
To Submit Your Expense Report
- On the Expense Report page, click Submit Report.

- The Final Review window appears with the User Submit Agreement. By clicking Accept & Continue, the user is accepting the terms and conditions of the agreement.

If you cannot successfully submit the report, a message appears describing the report error or exception. Correct the error, or if you require help to complete the task, contact Accounts Payable.
After Submission
Your Expense Report Approver or processor will send a report back to you if an error is found. The Approver or Processor will include a comment explaining why the report was returned to you. To identify and correct expense reports requiring resubmission:
- On the home page, in the Quick Task Bar, click the Open Reports tile. In the Manage Expenses section of the page, the report appears with Returned header on the report tile. The approver's comment appears below the amount.


- Click the report tile to open the report.
- Make the requested changes.
- Click Submit Report.
You can review the status of your submission in two different ways. Either will show you what stage of the approval workflow your report is in.
When logged in you can select the Expense module and take note of the status on that report’s tile:

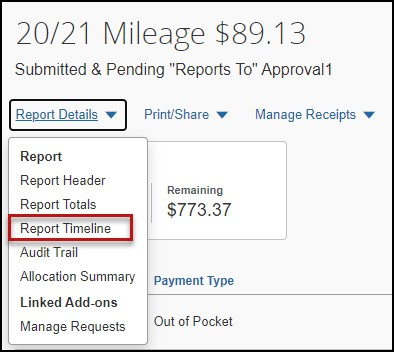
Alternatively, you can open the expense report and select the Report Details hyperlink, then select Report Timeline.
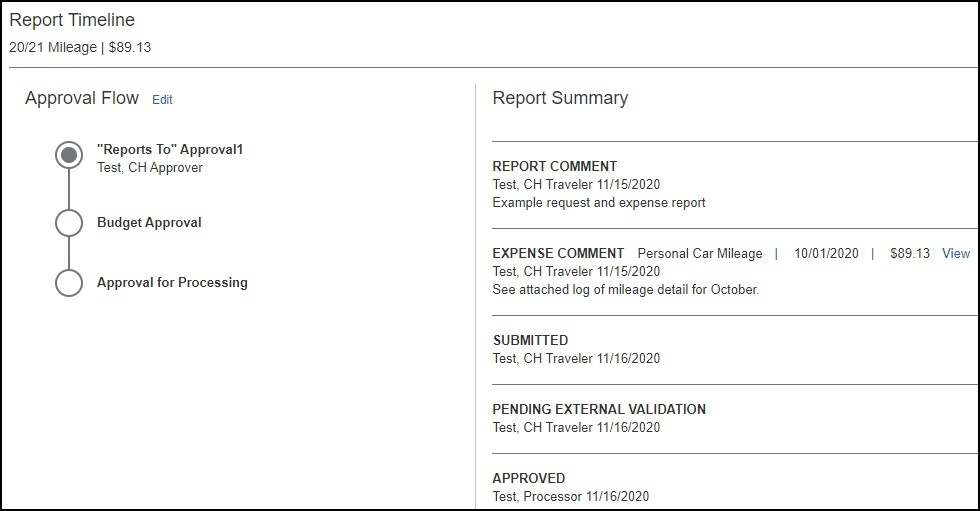
The Report Timeline will show what has occurred thus far and where it is in the flow. In the example below, this report is with the “reports to” approver. For your report, this would reflect an actual person’s name.
To Preview and Print the Expense Report
- On the Expense Report page, click Print / Share, and then select *CSU-Detailed Report with Summary Data.

- Click Print or Save as PDF or Email to get complete packet for expense report (includes copies of receipts attached). Please note, copies are retained in Concur according to our CSU retention guidelines and maintaining duplicative copies elsewhere is not required of departments.
Support Documents for Chancellors Office/CPO Submission
CPOs are inter-CSU transactions between a campus and the CO or another campus. The CO facilitates moving funds between campuses by way of a CPO (journal entry). The CO generally requires copies of the expense report and related receipts, depending on the allocation involved. The awarding department at the CO/campus will generally give recipients/participants instruction on what will be reimbursed and the department will have to decide if they will cover any variance that may occur between reimbursement allowed by CSU procedures and allocation received by the CO/campus.
In consultation with the CO Accounting team, in Fall 2018, a copy of the expense report from Concur and the supporting receipts can be utilized for CPO support in lieu of copies provided under paper environment. Sometimes the CO asks for receipts that are not required by the policy – it will be important for travelers/departments to retain those additional copies IF a CPO is in play or until these additional requirements are no longer exercised.
- In Concur, go to the expense menu and choose “Report library” to pull up submitted expense reports.

- Select the correct expense report and then choose “Print/Email” link and select “CSU-Detailed Report with Summary Data.” Print this report to PDF. The PDF version will also contain the related receipts that were attached. This file can then be sent to the appropriate CO contact or campus accounting team for CPO support.