Travel Request
Latest News
Creating a Travel Request
To create a request:
- Either:
- Click Requests on the header toolbar, and then select tile named Create New Request on the request page:

- Or click New, then Start a Request:

 If you receive an alert stating that "a vendor ID is not specified on your profile," please contact concurtravel@csudh.edu. In the message you will need to provide your full name and mailing address (to send your reimbursement check to). You also have the option of submitting a Direct Deposit Request. If you choose to submit that, still contact concurtravel@csudh.edu to inform that you have submitted the form so we will know to complete your vendor setup.
You can still submit the Travel Request, even with the alert, but you will not be able to submit an Expense Report.
- Click Requests on the header toolbar, and then select tile named Create New Request on the request page:
- The Request Header tab appears. Complete all required fields with red asterisk.

See field descriptions and further information in the table below
Field Name
Description
Request/Trip
Name
Enter a meaningful trip name, similar to a name given to a travel expense report. Your department may implement a standard naming protocol. Suggested naming convention Destination City, State and dates of Travel (ex. Long Beach, CA 5/18-5/21)
Trip Type
Select from the drop-down list
Travel Start Date
Date business expenses start. If personal days precede business dates, please be sure to still set travel start date to the date you leave for the trip.
Travel End Date
Date business expenses end. If personal days are after business dates please be sure to still set travel end date to the date you return from trip.
Traveler Type
Select from the drop-down list
Trip Purpose
Select from the drop-down list
If Faculty, is class covered?
Only Required for Faculty. Select from the drop down list.
Personal Date of Travel
Enter all dates which are personal. If none, place NA in field.
Destination City/State
If you anticipate travelling to more than one city and/or country, enter where you plan to spend the majority of your travel time.
Final Destination Country
The country will pre-populate based on the destination city selected.
Are you traveling with students?
Select from the drop-down list
Chartfield
Chartfield String will pre-populate based on your dept. If necessary, changes can be made by traveler or approver.
- Select Create in the lower right-hand corner of the screen.
- Add Expected Expenses, from the drop-down list or using the search function. Enter meaningful estimates for the related expense. The final travel request should reflect the anticipated cost for the trip and communicate amount of campus department funding a traveler is seeking for a particular trip. The Estimated total summarizes expected expenses and the amount that is being sought for approval. Note: if you have a limited budget for travel please make sure your travel request reflects that situation.
Sample travel request with notes about common expense choices and other navigation items.
- HOTEL

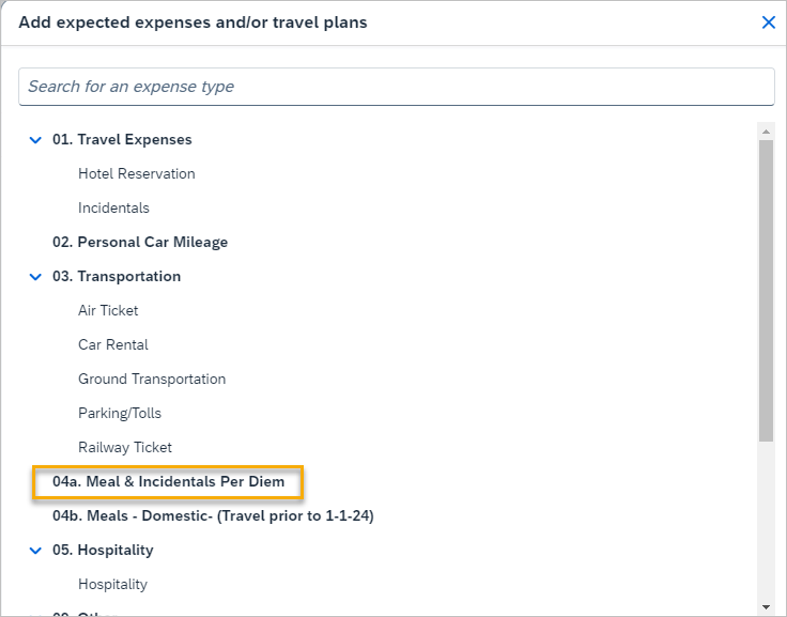
- MEALS
- Add the expense type:
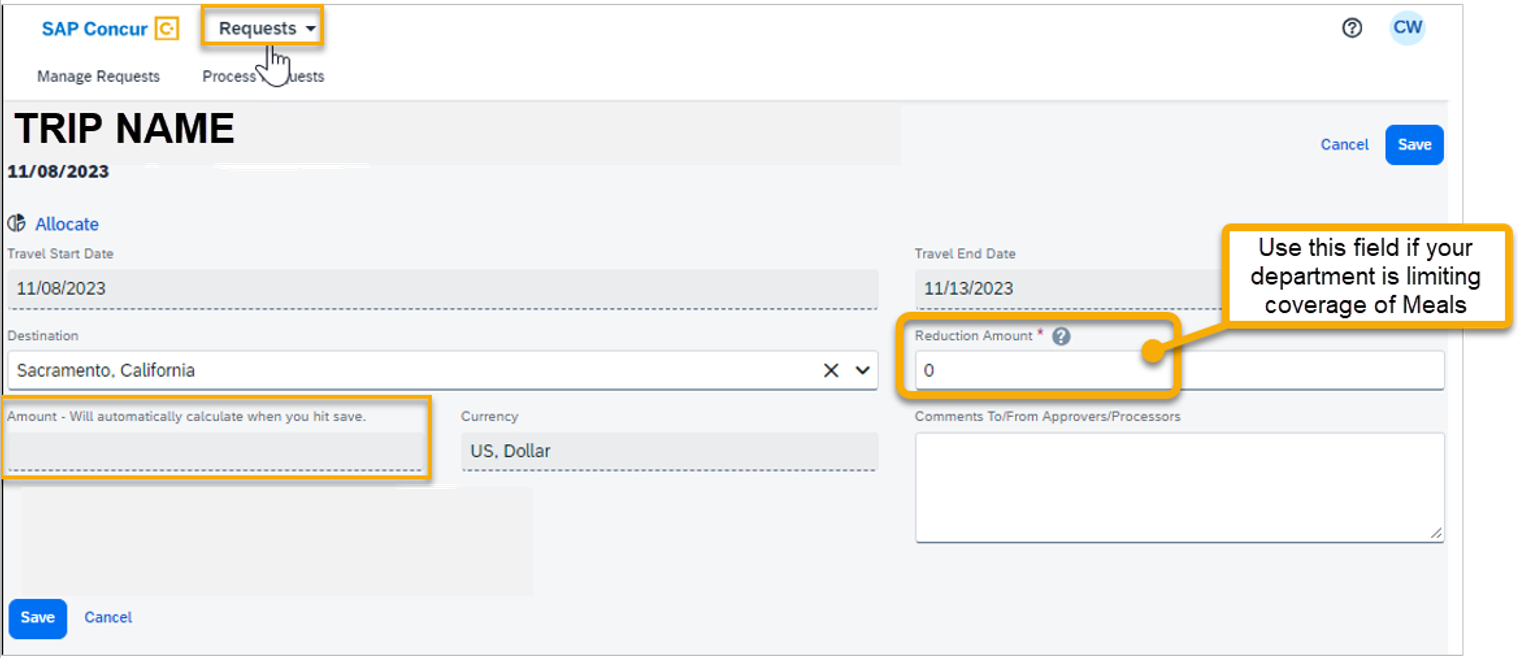
- Enter reduction (if applicable). Allowance will calculate upon clicking Save.
- Add the expense type:
- ALLOCATE
The allocate feature can be used to designate different chartfields for expenses if there is a need for “split” funding of a travel transaction.

- REQUEST DETAIL

- Edit Request Header - will take you back to the request header where you started and noted the trip demographics. You can revisit an entry in the request header until the request is submitted.
- Request Timeline – will show you the approval workflow and what steps have been completed or are outstanding. Once submitted, the request will route to the employee’s supervisor. Based on the chartfield entered on the Request Header tab as well as any additional chartfield allocated at the individual line item level on the Expenses tab, the report will route to the “cost object approver(s)” (minimum travel signature authority) to approve the funding. If international travel or any other type requiring additional review it will move to those responsible for that review – campus approvers, or Chancellor’s Office Risk Management for war risk countries.
- Audit Trail – will show you the timestamps of certain actions taken on the travel request.
- Allocation Summary – will show you the summary of any chartfield splits that might have been added to the request expenses.
- PRINT SHARE
Hyperlink will give you the option to save request summary as a PDF to save or share as deemed necessary. Note, it will be retained in the system according to CSU retention guidelines and printing or saving in duplicate is not necessary.
- ATTACHMENTS
Hyperlink will give you the option to browse for files to attach that support the trip request. This could be a conference registration showing location/dates of trip, or an itinerary for international travel, or any other support document that is helpful to have on hand for approvers.

- ALERTS
These will be messages triggered by certain elements of your trip. If red, this means an action must be taken before a request can be submitted. A yellow alert panel means there are requests or communication related to your particular trip components. For example, an alert can communicate the need to add comments and explain the trip, to attach files, etc. Alert count will change as requirements are met and alert is no longer necessary.
- HOTEL
- Once the travel request is complete, click the Submit button.

Types of Requests
Travel to international destinations generally follow the same process for creating a travel request as a domestic trip, with a few deviations.
- Trip type should be designated as International.
- Request must have an International Travel Authorization Form attached (please note that the form is different for Concur users). The Risk Management office will utilize this data to facilitate working with a traveler for necessary foreign travel insurance and other necessary components for a trip.
- All expenses should be noted in USD. In the expense report stage currency conversions are more relevant with actual expenses.
Blanket mileage requests can be used for recurring mileage and parking for a given fiscal year. Please note that Blanket Travel Requests are allowable for only in-state travel, mileage and parking fees only. If there will be a registration fee or any other expenses, please complete a regular, non-blanket Travel Request for the trip. Expense Reports for blanket requests should be submitted monthly.
- Enter general information about the activity and note the time frame from July 1st through June 30th (fiscal year). Note the trip purpose as Mileage Only and select Multiple Locations in the destination field.

- Enter estimated mileage/cost for the entire year. Prior year could be used as a reference point and should be adjusted for any known variances for a given year.

Travel with no funding from the campus, e.g. travel that is fully funded by outside sources or by the traveler, should be evaluated for connection to University business. If directly connected to University business that supports campus mission, a travel authorization should be completed to ensure insurance coverage.
Note: Accepting travel gifts from a 3rd party may result in a conflict of interest (COI). Please refer to further information about COI.
- Follow steps above, "To Create a Request," to create a travel request. Once trip details have been added to the travel request header, select “Liability/Unfunded” from the expense list
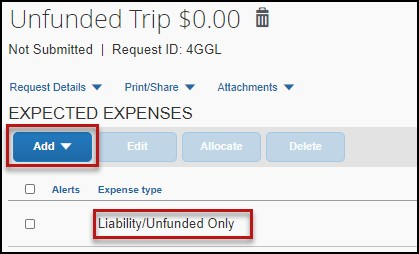
Add $0 to the transaction amount and make a note in the comments field for reference.
- Once trip is approved and you are notified via email it is best to go back into Concur and follow the steps above for marking the request as “Closed/Inactivate Request.” Otherwise, the request will close on day 61 post trip but in the meantime the traveler will be prompted with reminders about submitting expense reports. Marking closed will reflect there are no expected expenses and will eliminate those expense report reminders.
Group Travel occurs when an employee accompanies a group of students on a travel trip.
BOOKING
Group Travel cannot be booked yourself within Concur. There are three other options:
- Book outside of Concur
- For groups of less than 10, call or email to book with the Concur travel agency:
Available 24/7, Main Hours: 5:00 AM – 5:00 PM Pacific, Monday - Friday
Advisor Team: (855) 993-0939 or (801) 613-2826
Email: trips@cbtravel.com - For groups of 10 or more regular travelers or 6 or more Athletics travelers (depending on airline and NCAA requirements), call or email to book with the Concur travel agency:
Hours: 5:00 AM – 5:00 PM Pacific, Monday - Friday
Advisor Team: (866) 371-3580
Email: universitygroups@cbtravel.com
Emergency Afterhours Service: (800) 960-7862, Code P6LV
The processing of Group Travel Requests and Expense Reports do not differ too much, but there are a couple of minor nuances.
- Create a Request like you normally would and fill in the trip information.
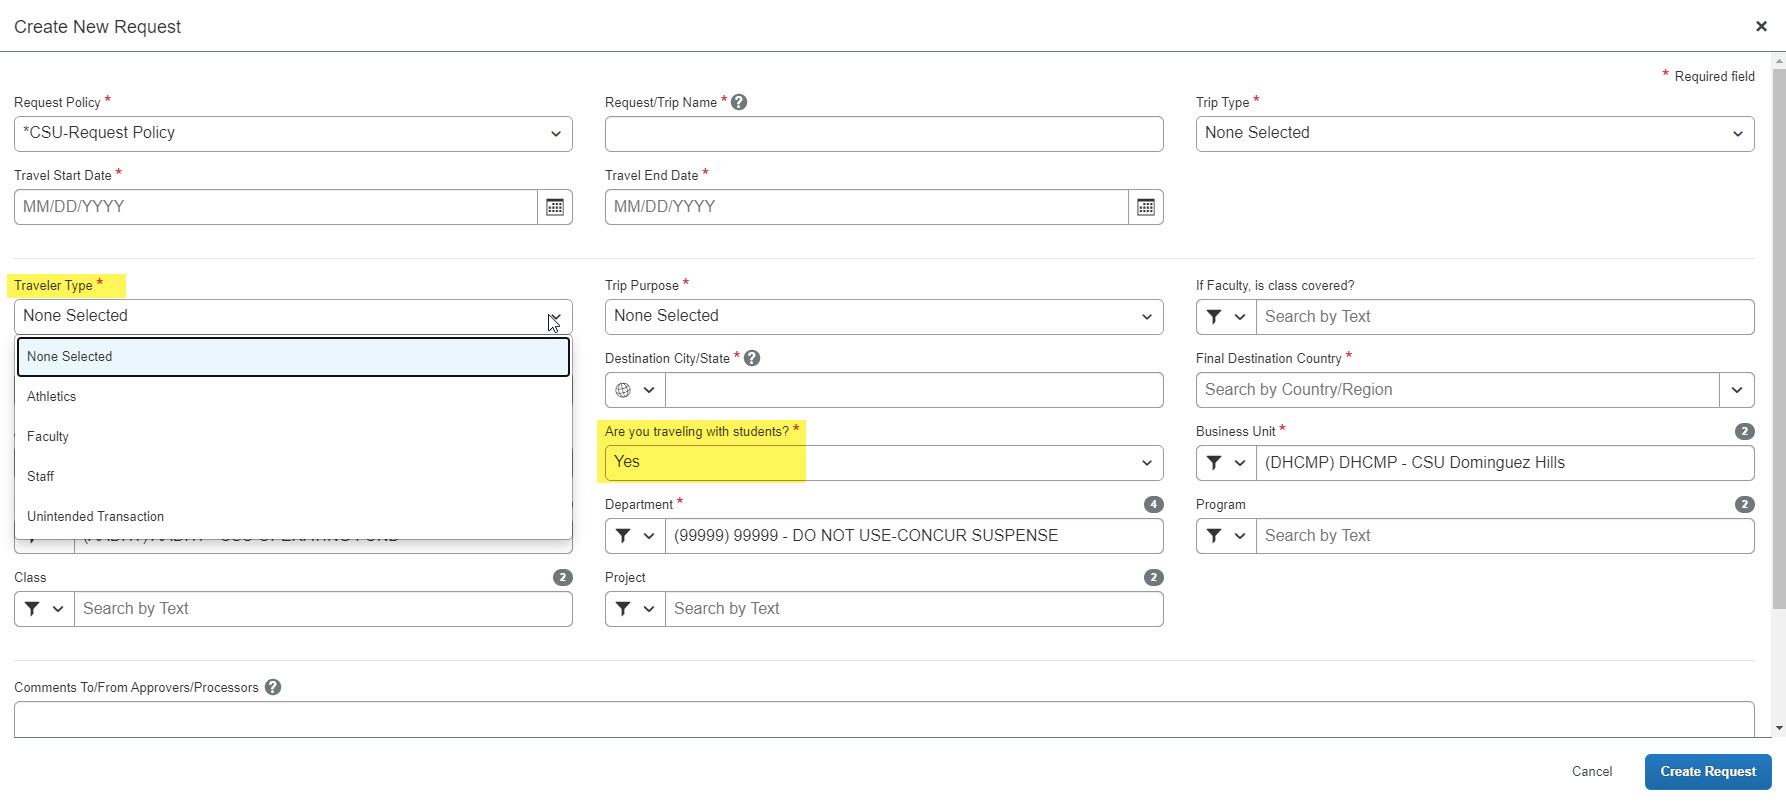
- If the group is a sports team, select Athletics for the Traveler Type. If not sports, select Faculty or Staff, whichever is applicable to the person accompanying the student group.
- You will need to indicate YES that you are travelling with students.
- You will need to submit a Liability Waiver, for each student, to Risk Management at riskmanagement@csudh.edu.
- Click CREATE.
- For guidance requesting an advance for group travel, please refer to the section called "Requesting a Cash Advance."
- Add most estimated expenses as you normally would. There are only a couple of variances, described below.
- Accommodations: To add the estimated cost of multiple hotel rooms or Airbnb/BRBO rentals, select the "Other Accommodation" expense type, which will allow you to enter in the total for all rooms.
- Meals: To add the estimated cost of meals for the group, select "Team/Group Meals." Add the total estimated cost of meals for the trip.
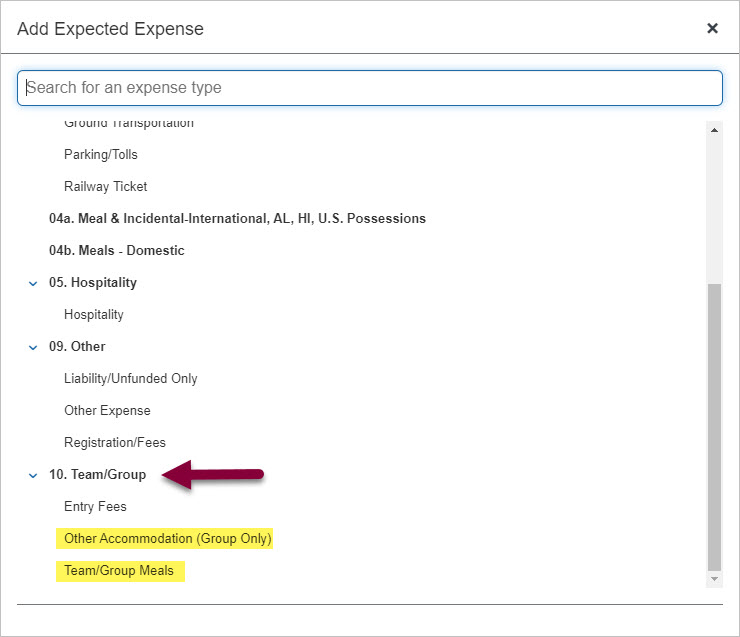
- After you've entered all estimated expenses, attach any required documents.

- Submit Request.
Cash advances are only allowed for student group travel accompanied by a CSUDH employee. All requests for advances must be submitted at least two weeks prior to the date of the trip. Advances will be released no earlier than one week before the trip.
If you frequently travel with students, please apply for a Travel Card. This will alleviate the need for an advance. For those without a Travel Card, cash advances will still be available for group travel and may be entered on the travel request. However, in order to be eligible to request a cash advance, approval from the Accounts Payable department is needed. Your Concur settings must be updated to reflect this option. Please contact the Travel Desk at concurtravel@csudh.edu.
To Request a Cash Advance:
- Navigate to Request, New Request (or remain in request currently working on).
- Select Request Details and then choose Add Cash-Advance. Note, a user will not see this option if approval and additional set up noted above has not occurred.

- Add amount and then select Add Cash Advance button. This will add the cash amount to your travel request and increase the anticipated expense.

- Complete and Submit Request as normal.
If there is a need to revisit and alter a request because dates, locations, or significant cost changes are necessary there are a few options.
Recalling a Request
You cannot change, cancel, or delete a Request that has been submitted unless you Recall it first. You can only recall a request that is not in “approved” status. If the request has been fully approved you will need to take different steps as noted below in Replacing Request.
- Click the Request Name from the Manage Requests.
- Click Recall.

- Click Yes to confirm the Recall. The status of the request is updated to Sent back to user.
- Make any necessary changes, then select Save, Attachments, Print/Email, Cancel the Request or Submit Request to complete the process.
Replacing a Request
This step is only needed in the case where a request has been fully approved and details have changed in such a way that the prior approved request is no longer valid.
- Click the box next to the Request Name from the Manage Requests page and select Copy Request.

- Enter a different request name (so you can differentiate between old and new) and then enter starting date and check the Expenses box. This helps cut down on duplicative data entry if there are alike expenses between old and new. Click Create New Request button.
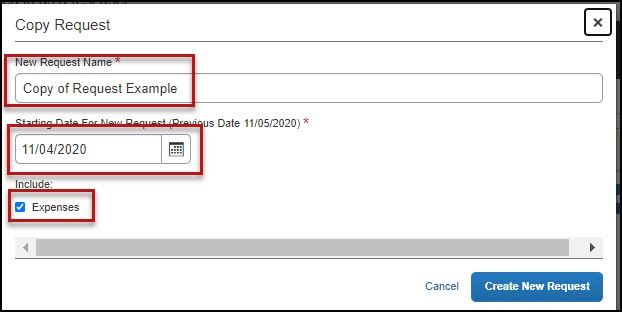
- Make any necessary updates to the new request and submit for approval.
Cancel a Request
If a trip is canceled or elements have changed so significantly that you need to replace a request as noted in the prior section, please cancel the request by going back to the Requests tab and open the request.
- Open request and select Cancel Request.

- If your prior request had booked travel reservations, you will want to go to your Trip Library and make sure they are noted as cancelled/withdrawn (if that is your goal). This will ensure the campus/employee does not incur unnecessary expenses for not canceling on time.
Check the “include withdrawn trips” box and click Search.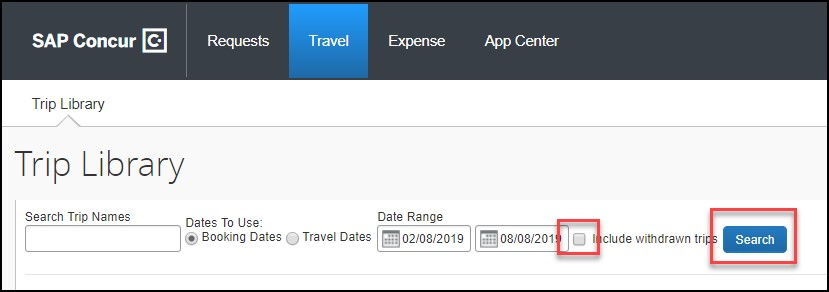
Closing/Inactivating a Request
The system will automatically close open travel requests 61 days after a trip is complete. Reminder, expense reports need to be submitted within 60 days from end of trip date. If all relative expenses have been submitted a user can manually close/inactivate the request. This is not a required step.
- Select the Request tab, selecting the specific request and select the Close/Inactivate Request.

The difference between this status and cancelation is that cancelation signals a true recall of an anticipated trip. Closing/inactivating means the trip is complete. If by chance an expense needs to be submitted after a request is closed, please reach out to the Travel Desk and we can assist.